
We are making progress on the UI elements in TinkerFlow inside Godot. In our previous post we showed some previews of the UI and where we test Godot elements and what is where placed.
The next bigger task is the programming of step editing or step inspector UI in Godot.
When clicking on a step inside the UI to edit steps.
So, the part of the UI to set up the process steps with logic, scene interaction, and function or condition calls.
As known before, steps can contain multiple behaviors and transitions.
Behaviors are actions that are executed while the step is active and interact with the user or with the scene. Transitions control the step change from step A to step B with given conditions. Conditions are checks for each transition that needs to be fulfilled (true) so that the transition is fired. If a transition is fired, the active step will change to the target step of the transition. (This follows the finite-state-machine pattern.)
The step inspector#
TinkerFlow uses the graph element of Godot to render the steps and the connection of the steps.
If the user opens the process by opening a scene where the TinkerFlow node is located, the process will load by clicking on the TinkerFlow Window.
However, each step is a node inside the node graph, each transition a point from one step to another step.
If a step is clicked, the step editor or step inspector (we are thinking of a good name) renders the current properties of the step.
Every renderer must be created to display the properties of Behaviors or Conditions (Transitions are a collection of Conditions in the editor).
So each behavior with custom properties like scene objects or Godot resources needs a renderer.
Godot helps with the default renderer of each property, but these are not good for a nice UX and lack helping elements like tooltips or a description.
Custom UI renderer#
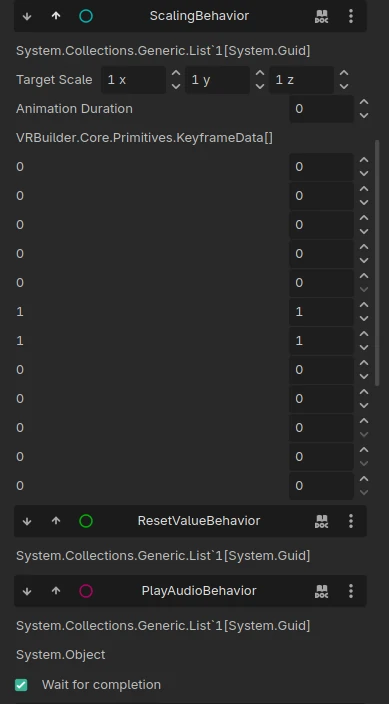
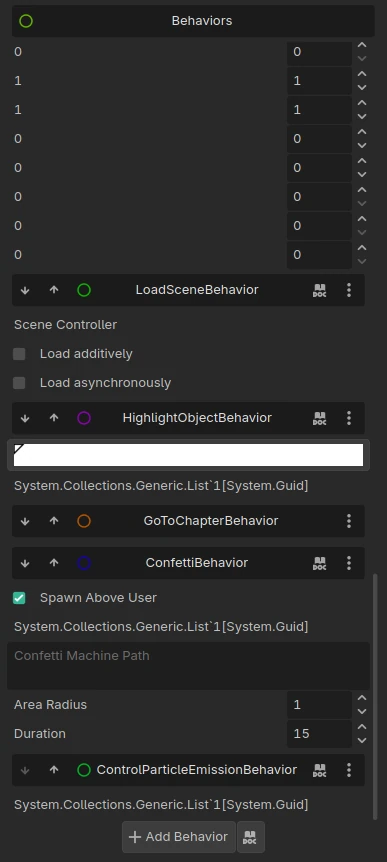
The pictures show the default renderer, it is good for simple elements like numbers and texts (text fields or other input elements).
However, the animate behavior results in a mixed view of each property because of the default renderer.
The animation curve contains a list of numbers, hard to interpret without any labels.
These special or custom properties need a custom renderer to display input fields and validation with tooltips to explain the properties and set the values easily.
Another custom property, such as scene references to handle the interaction of the process with the scene, needs a more complex renderer.
The single objects in the scene or multiple objects or objects which are part of a group tag can be used, and they are referenced by a GUID (unique identifier).
GUIDs are managed by the SceneObjectRegistry which controls all scene references at runtime.
Every GUID is saved inside the process within all behaviors and conditions metadata and is linked to the correct scene object.
With that information all scene-based interactions are technically engine independent, so cross-engine processes are also possible.
How the drawer system works#
When a step is selected, the inspector asks DrawerLocator for a factory that can render the step’s type.
The locator caches all IProcessFactory implementations at startup, attributed with [DefaultProcessDrawer] or [InstantiatorProcessDrawer].
It walks the concrete type up through base classes, then checks implemented interfaces, and finally falls back to object.
@startuml
tinkerflow-theme

package "Process Editor" {
  [ProcessGraph : GraphEdit] as Graph
  [StepWindow : VBoxContainer] as Inspector
}

package "Drawer System" {
  [DrawerLocator] as Locator
  [IProcessFactory] as Factory
  [BehaviorInstantiatorFactory] as BehaviorFactory
  [ConditionInstantiatorFactory] as ConditionFactory
  [UniqueNameReferenceFactory] as UIDFactory
  [AnimationCurveFactory] as CurveFactory
}

package "Runtime" {
  [SceneObjectRegistry] as Registry
  [ProcessSceneObject] as PSO
  [UniqueNameReference] as UID
}

Graph --> Inspector
Inspector --> Locator
Locator --> Factory
Factory --> BehaviorFactory
Factory --> ConditionFactory
Factory --> UIDFactory
Factory --> CurveFactory

UIDFactory --> Registry
Registry --> PSO
PSO --> UID

@enduml
At the top, ProcessGraph (a GraphEdit node) renders the node graph and fires OnStepSelected to StepWindow, the inspector panel below it.
The Drawer System handles the middle layer with DrawerLocator, that takes the selected step, walks up its type hierarchy through base classes and interfaces, and returns the matching IProcessFactory (one of BehaviorInstantiatorFactory, ConditionInstantiatorFactory, UniqueNameReferenceFactory, or AnimationCurveFactory).
Down at the bottom, the Runtime layer resolves scene references.
UniqueNameReferenceFactory queries SceneObjectRegistry, which maps GUIDs to ProcessSceneObject instances, and each ProcessSceneObject stores its own unique name.
Factories exist for behaviors (BehaviorInstantiatorFactory), conditions (ConditionInstantiatorFactory), scene references (UniqueNameReferenceFactory not done yet), animation curves (AnimationCurveFactory), and many others inside Core/Editor/UI/Drawers.
Each factory creates a Godot Control subtree with appropriate input fields and validation with tooltips.
Scene references#
Scene references use UniqueNameReference to store a stable name string.
The UniqueNameReferenceFactory builds a picker that shows the current object, validates it has the required component type, and offers a “Fix it” button that adds the missing ProcessSceneObject or property PSO child automatically.
// UniqueNameReferenceFactory
public override Control Create<T>(T currentValue, Action<object> changeValueCallback, string text)
{
    var control = new VBoxContainer();
    if (!RuntimeConfigurator.Exists) return control;

    var uniqueNameRef = currentValue as UniqueNameReference;
    string oldUniqueName = uniqueNameRef?.UniqueName;
    Node? selectedSceneObject = GetGameObjectFromID(oldUniqueName);

    var hBox = new HBoxContainer();
    var label = new Label { Text = text };
    hBox.AddChild(label);

    ObjectDrawer od = EditorGUI.ObjectField(label as Label, selectedSceneObject, typeof(Node), true);
    od.SelectedObjectChanged += OnSelectedObjectChanged;
    hBox.AddChild(od);
    control.AddChild(hBox);
    return control;
}

protected Node? GetGameObjectFromID(string objectUniqueName)
{
    if (string.IsNullOrEmpty(objectUniqueName)) return null;
    if (!RuntimeConfigurator.Configuration.SceneObjectRegistry.ContainsName(objectUniqueName))
        return GetGameObjectFromInstanceID(objectUniqueName);
    ISceneObject sceneObject = RuntimeConfigurator.Configuration.SceneObjectRegistry.GetByName(objectUniqueName);
    return sceneObject.GameObject;
}
The SceneObjectRegistry maps GUIDs and unique names to ISceneObject instances. ProcessSceneObject (a Node with [Tool], [GlobalClass]) registers itself on _Ready and exposes its Guid and UniqueName.
This is the same component system described in the Component System inside TinkerFlow post, the sibling lookup via ComponentExtensions.GetComponent<T>() powers the picker here but it is also not done yet!
Reusable UI elements#
Each step click calls an editor renderer which looks for a custom renderer of the element, and if there is no custom renderer, it will fall back to the default one. This leads to a structure of custom renderer elements, but the trick is to do it just once! So if there is a new property or element renderer needed, it will be implemented and is usable for every other renderer. This is a bit related to the component system of, for example, Angular or Swelte. Each renderer contains the view logic and holds the current property (the specific condition or behavior element) and can also modify the property by user inputs.
// StepWindow
public void OnStepSelected(StepEventArgs? newStep)
{
    if (newStep == null) return;
    step = newStep.Step;

    if (stepDrawer != null)
    {
        RemoveChild(stepDrawer);
        stepDrawer.Free();
    }

    stepDrawer = DrawerLocator.GetDrawerForValue(step, typeof(Step))?.Create(step, ModifyStep, "Step");
    if (stepDrawer != null) AddChild(stepDrawer);
}
If something changes inside, the UI will redraw the step editor and save the process information later. VR Builder itself had problems with the Unity-based OnGUI which redraws the whole UI every frame inside the editor. This leads to a very slow and laggy process editor, and this was solved by caching and limiting the redrawing of the UI over the FPS settings (fixed at 15 redrawing per second). It is not optimal, but a good solution, and we understand the complexity of the whole editor very well. We try to only redraw the UI when there is a change over a Godot-based Signal, but then how to avoid multiple redraws and multi calls?
In Godot the ProcessGraph emits a Modified signal on any graph change.
The graph’s _Process loop checks a Dirty flag on each node and calls RefreshNode only for those that changed.
StepWindow recreates its drawer only when OnStepSelected fires. No per-frame layout passes.
// ProcessGraph
public override void _Process(double delta)
{
    foreach (ProcessGraphNode node in GetChildren().ToList().OfType<ProcessGraphNode>())
        if (node.Dirty)
            RefreshNode(node);
}

// Connection signals
public override void _Ready()
{
    NodeSelected += OnNodeSelected;
    NodeDeselected += OnNodeDeselected;
    ConnectionRequest += OnConnectionRequest;
    DisconnectionRequest += OnDisconnectionRequest;
    BuildContextualMenu();
}
If we do this with all custom renderers, new properties or custom behaviors or conditions can easily be added with less and less work.
The video shows the current usage of the UI and how references can be set and how the UI is redrawn.
We hope you enjoyed this blog post, see you next time!